Digital Photo attempt for my book pages...tips?
-
@marsha-kay-ottum-owen You are better off working with a scanner. I the PS painting class with the 4 artists one of them painters her stuff in water color then scans it in and then works on it to clean it up. A lot of people cut their piece in two and scan it as two pieces or take it to a pro to have it done.
-
@rcartwright Thanks for your response. I have always scanned and cleaned up on GIMP before. This time around I was told I should work on one piece of paper (I was putting two together and then painting the spread as I did before. ) The paper this time is 12 x 18. I little too large for the scanner, even if I cut them in half. Maybe I will see if they could be trimmed down without losing anything important but....we'll see. I appreciate your response!
Marsha Ottum Owen
-
Hi Marsha, I'm not an expert, but I did photograph all my inktober stuff. Here are my opinions:
f/8 or larger
Iso 100 (keeps it clear without grain)
Shutterspeed- just dependent on how bright it is outside. The key to getting a lower shutterspeed to work is using your tripod, and a timer or a remote control to take the picture, so the camera doesn't shake.And almost just as importantly- post processing! If you were in a dark room, you would be manipulating the images to get a certain desired result. Same with digital! Your dark room is the software, in your case gimp, and you need to tweak your photographs in post processing to get your desired result.
Yours do look a bit dark- and honestly I think that will probably be ok. I think it's always better to go a little darker than a little lighter. If it's a little lighter you can't always get your details back. If it's a little darker, you can usually get it lighter without losing all your details. So yes, edit those images in gimp. Make them lighter and possibly tweak the colors.
-
Thanks, Tessa! I sent my son the photos too and he gave me a lot of good tips, pretty much the same as yours. He photographs products for his EBay business and they look really good. I'm going to try one more time using the tips given. I'm mainly a clone tool user for clean up on GIMP so will have to watch some youtube videos to learn how to tweak colors, etc to make them lighter or darker, brighter, etc. I feel more hopeful. Also, my son offered to do that part for me because it's easier than explaining. I might take him up on it
")
-
Hi. This is easy. To do it properly you need light. If you have a couple of flashes (not the flash of your camera) off-camera flashes and softboxes set one in the left and one in the right taking good care of the distances.
I think you don't have flashes. You need light again. Not direct sun, but open shadow (you can look for "open shadow in youtube). Use an easel for the pages so they can be set almost vertically. Basically, with the sun in front of you, look for a place in shadow who is near a white big wall or surface. This is going to be your reflector. if you have a tripod, use it, if not, be nice when shooting and make three photos of every page at least, just in case some got blurred. Put yourself in front of the page and at the correct angle. If you are looking through a viewfinder you can correct better, if you only have the little screen concentrate in the page looks straight and at the same distance and angles in the four sides.
The glass. I recommend shot this with a 90mm minimum. 120mm, 150mm. For an image with real proportions without distortions.
Now the settings. If you are shooting with a Full Frame camera, f-8 can do. If you have a crop sensor you can do at F-5.6 or less. The smaller the sensor the less f-number you can use. 5.6 is very good number in any case. The lenses work better in the middle of his range. In the extremes, you can have vignetting and other undesirables effects.
ISO Base of your camera, some have 100, some 200... Don't raise your ISO
And shutter speed, if you shoot with a tripod no problem. If you shoot without a tripod I recommend no less than 100 and the more the better. If you can get to 500 do it. If your camera has Image Stabilization technology you are safe at even 50 if you don't move. IS is a miracle! But even with stabilization speed don't hurt so the more the better.
Overexpose one stop, or perhaps more if you want the white, white. If you have histogram in your camera, let it to the right.
And finally, edit and retouch the final image to achieve the results you want. If you don't have the skills there's a lot of retouchers that work well online.If all that is too much, the more important here:
Find light. You need light. Light is everything in photography. Use a Wall like a reflector on a sunny day if you don't have flashes.
And overexpose one stop, check in the screen that nothing is burned. In that case, correct 1/3 of step shoot and check again. -
@marsha-kay-ottum-owen
You don't need to cut your piece in half or trim it down to fit the scanner! You can scan something in two or more sections (without physically changing the painting) and then stitch it together in your photo editing software. -
@zombie-rhythm How do you photograph that many spreads with consistent light outside?
-
@zombie-rhythm Thanks. I'll definitely remember more light!
Marsha Ottum Owen
-
@rcartwright I don't think you can unless you are extremely lucky. If you do a decent job, you can sinch exposure etc in post. This can do it if you want them for your web, for example.
But, the proper way to do this is (if you are photographing the pieces because you want to publish a book for example) with flashes and softboxes or any kind of diffusers. Using a Color Checker and having your professional screen (your screen have to represent adobe color profile minimun) calibrated is needed too. You want your work to be displayed with accurate colors in your book) -
@marsha-kay-ottum-owen said in Digital Photo attempt for my book pages...tips?:
@zombie-rhythm Thanks. I'll definitely remember more light!
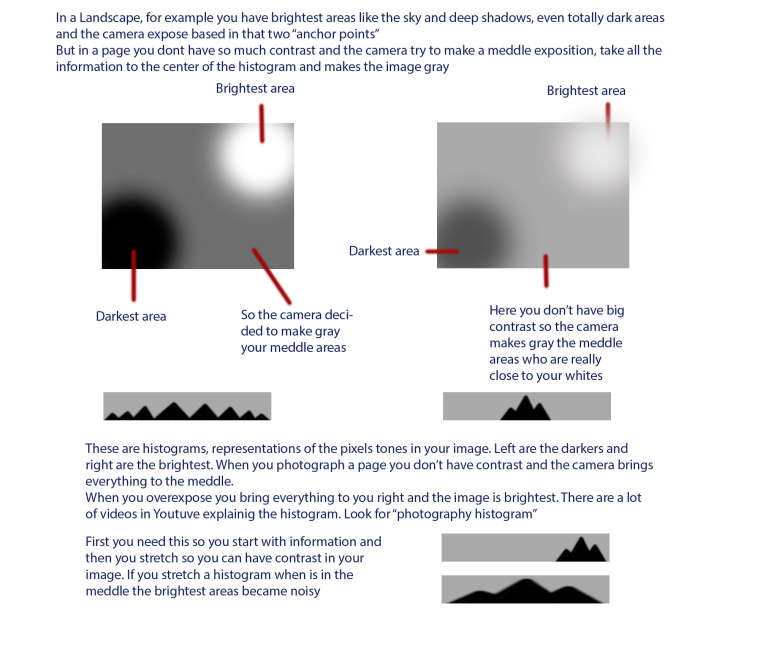
And overexpose, when you fill your frame with a page like in this case, the camera tries to expose for the middle tones, and because you don't have areas with bright light and deep shadows, the camera is going to make your whites to look gray. That's the reason in this case you have to overexpose if you want a good exposition. In post you can turn down your blacks and shadows if needed while maintaining your whites up.
If you need this for web you are going to be fine. If you want to publish a book or print them for whatever reasons I recommended making a little studio with light you can control and invest time in learning the process. Is fun!!!! -
This post is deleted! -
@zombie-rhythm
-
@zombie-rhythm Very interesting! I definitely have a lot to learn. Thanks! I live in a fifth wheel and don't have much room for a photo studio but I have been looking things up on youtube. I tried the outdoor method, as shown in my post, and it still looked dark. I tried to match the view to match my colors but it seems it would have been better to oever expose and then it would have come out less dark. I think we're going to try it again. We've done it twice already and, though we increased the ISO and F stop it looked too white to me and didn't look like my art so we turned it back down. Now, it seems we should have left it as it was and it might have turned out better. I used brighten/contrast in GIMP and it looked less dark but th colors were kind of weird and I need to learn more about making adjustments in GIMP too. I have to say I am learnin ga lot with each project I try to complete. This ia a whole new area of learnign for me