How to Draw Everything: 2 point perspective question & feedback requested
-
Yes, exactly. Where the green lines and the red lines cross each other, that will be the back corners.

Like I pointed out previously, it's tricky to plot things up exactly so that those points will connect to make a straight back edge, so you just kind of have to adjust it.
Keeping track of all of the points and lines gets confusing, but it will get easier and easier. You are doing well so far!
Website: www.tessawrathall.com
Instagram: www.instagram.com/tessawrathall_art/
-
You have to fudge it, because even the very smallest variance of angle to the horizon line between all the vanishing points can make a big difference where the red lines and green lines intersect in the back. Looking at your drawing for example, it looks like your red lines actually converge at a point a little higher than the horizon line, where as your green lines converge exactly on your established horizon line. Your top red line doesn't quite angle steeply enough to meet the bottom line on the horizon line, like your green lines do. I think that may account for why you need to fudge it.
Fudging it is a lot easier than starting over, and the viewer doesn't need everything to be concise like a computer for it to be believable.
Website: www.tessawrathall.com
Instagram: www.instagram.com/tessawrathall_art/
-
@tessw thanks so much for the encouragement
 I thought I might be able to get away with bypassing this with Will's "visualizing drawing in perspective", but when he got to the section on putting spheres in boxes, I realized nope, I can't get to that without a much better understanding of cubes in perspective. I need to be able to put spheres in boxes to draw my little dogs correctly, even if I chicken out on environments
  So I am going to go back to square one (cube one
  ) and hopefully get past my mental block by working through those exercises and asking for help when I get stuck. Thanks again!!
 -
@tessw you nailed it--this is already starting to make more sense to me, thanks!
-
@bichonbistro You're welcome. You are smart for going back to square one. That is what I did. I've been where you are. I avoided perspective for a long, long time because I thought I was too dense to understand it. It took a lot of confusing and slow practice, but I got to a fairly good working knowledge eventually. Your brain is going to hurt now, but it will make your art process a lot easier in the future. Good luck!
Website: www.tessawrathall.com
Instagram: www.instagram.com/tessawrathall_art/
-
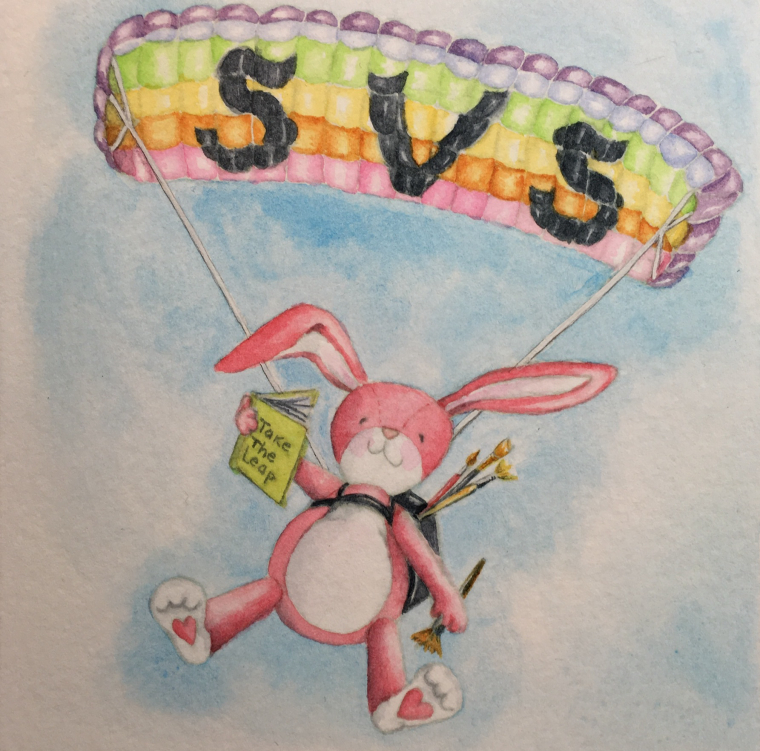
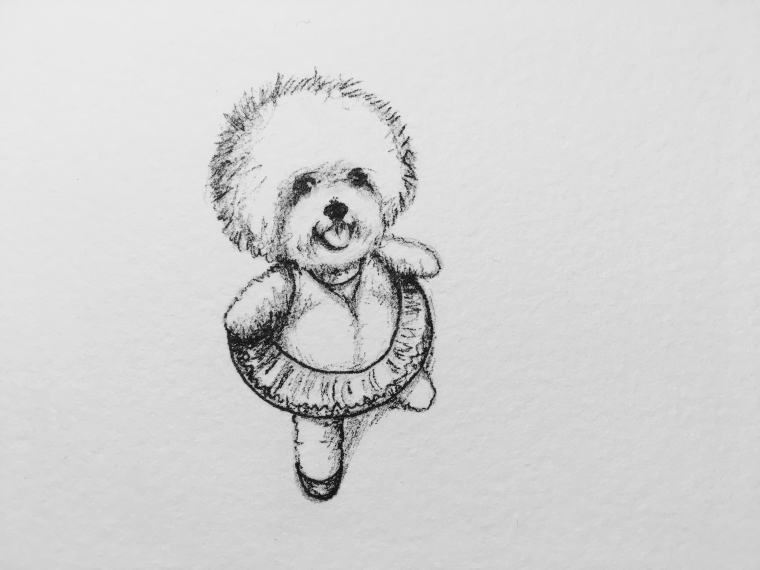
@tessw I have tried to do two simple drawings of single characters with points of view different from my standard looking straight ahead. The SVS rabbit is an attempt at looking up at the rabbit, the fat little doggie ballerina is an attempt at looking down. I ran into problems just trying to eyeball both and can see that things aren't positioned quite right because I don't yet know how to apply perspective in the real world of characters and objects. so I thought ok, draw horizon, vanishing points and boxes and cylinders, then put characters into those shapes.
But I couldn't even figure out where my horizon was. I am feeling so dense about this, but determined to figure it out. I wanted to be looking down on the ballerina, with the right foot facing me pulled behind her (so ballet shoe not visible logically)--with an understanding of perspective, I should be able to convince the viewer that the right leg is pulled backward, but I didn't know where to start.
Similarly, with the red rabbit, I wanted it to be floating down toward the viewer, as if just having leapt off a tall building (notice that the buildings are missing, because that would require 3 point perspective!!). Until I get perspective through my thick skull, I am going to remain stuck. Can you walk me through how you would approach setting up the horizon, vanishing points and basic shapes for one of these drawings in order to get the intended perspective right?
It gives me hope that this was tough for you and you seem to have such a good understanding now
Thanks so much!
-
@bichonbistro Ok, first I want to say that I think you've done a pretty good job with the perspective here. It looks like the concepts are starting to sink in by the way you are placing your details and forms and also the shadow angle in the doggie piece.
I think with the SVS bunny, giving it a little more space, especially below it, would go a long way with the illusion that we are looking up at it. I think that the way you've drawn the pose and angle of the bunny is successful overall.
I think you've done a good job with the doggie as well, it's just that the pose may not work with the perspective you've chosen. You may have to tweak the pose, the perspective, or both until it looks right. Sometimes you can make things incorrect if it looks better (For example, maybe adding a shoe to that back foot would make it look more "right" even if it's technically wrong).
It can be frustrating knowing exactly how to apply perspective to a working method. I think it's different from artist to artist. I'm still personally trying to figure things out, and my methods change all the time.
My short answer, for now, on how I'd personally approach these drawings is that I would not bother with horizon lines, unless I was adding in more rigid structures like architecture and perhaps some landscape features along with them. If I did want to figure out the horizon line for some reason, I would make very small thumbnails and play around with the horizon lines and vanishing points, and use that as a reference for my final piece- remembering that for both of these drawings, the horizon line would likely be out of the picture plane. For the bunny I might use a single vanishing point, somewhere above it's head and place a cylinder or a rectangular plane, vanishing to that point as a rough guide. With the doggie, it would just take a lot of tweaking between angle and pose, so that things read well. Sometimes the pose and the angle don't mesh well, so you have to tweak and maybe cheat things to get it to work.
For both drawings, I might look at photo reference, use one of my kid's toys, or make a rough model out of clay to figure out how things overlap and how much you see of certain things like legs and arms. In some instances, I've gone into sketchup and loaded a 3d model from the database, and play with the angle and zoom lenses to see what's going on. Sometimes I draw a rough idea of the pose in a couple of different angles, and see how it relates to the ground plane, so I then know where to place the legs- which would be applicable to the dog drawing. It's been an eye-opener for me to see artists, who seem comfortable with perspective, still using help like photo reference and Maquettes to help them along with character poses and angles.
Sorry if that was confusing- I just wanted to stop in, so you know I read your reply. Inktober is taking up most of my art time, so a better explanation, examples, and study suggestions will have to wait until later, unless someone else jumps in. For now, I would be proud! These kinds of angles are tricky and I think you are understanding more than you may think.
Website: www.tessawrathall.com
Instagram: www.instagram.com/tessawrathall_art/
-
@tessw thanks so much--I have been blown away by your creation of a storyline to expand the inktober prompts, so I totally understand how that is taking up your time. It's so kind of you to reply in the midst of inktober.
I have never heard of "sketchup" or "maquette" (though I had unsuccessfully tried making a mini model with my kneaded eraser
 ), so I have additional aids to investigate, thanks.
I really wanted to put tall buildings in the bunny picture, so I would have needed to identify the horizon line to connect the 3rd vanishing point above the bunny to that line. Through thumbnails I realized I just wasn't getting it.
I will go back to find photos with the point of view and angles I am trying to achieve, then try to identify the horizon and vanishing points in those photos. I just noticed procreate has a perspective aid--maybe I can import those photos and see if procreate guidelines clarify things.
As I understand it, any time I introduce a plane at an angle (the doggie turned vs facing forward), it requires 2 point perspective.
I keep thinking of Will's penguins at all different angles and locations in relation to the horizon and I want to be able to do that! But I think I need to step back to 1 point perspective and try the doggie facing front to see if I can achieve drawing it on a horizon line, above, then below it.
Thanks for the guidance and encouragement--I am a slow learner so I will be working on this well after inktober ends!
-
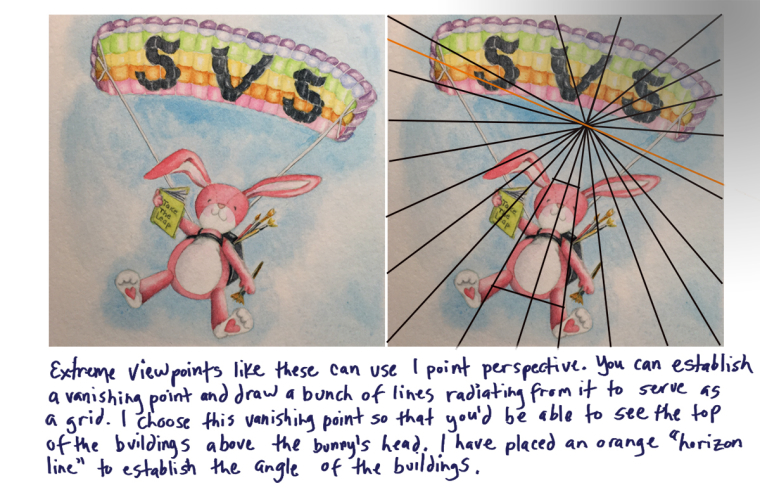
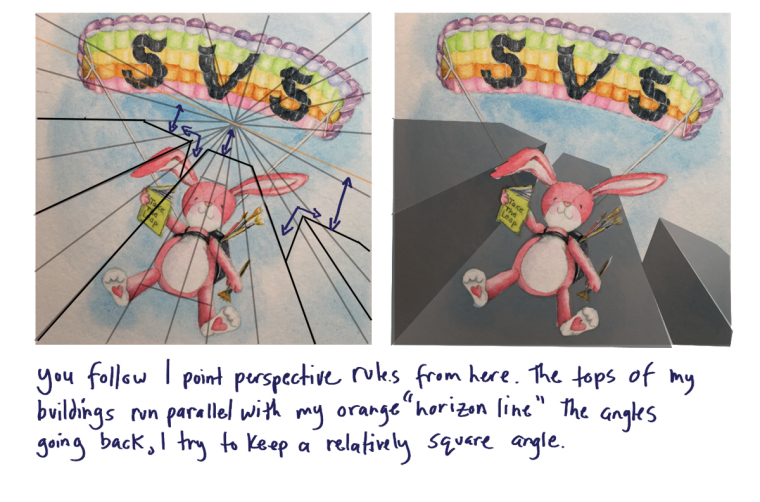
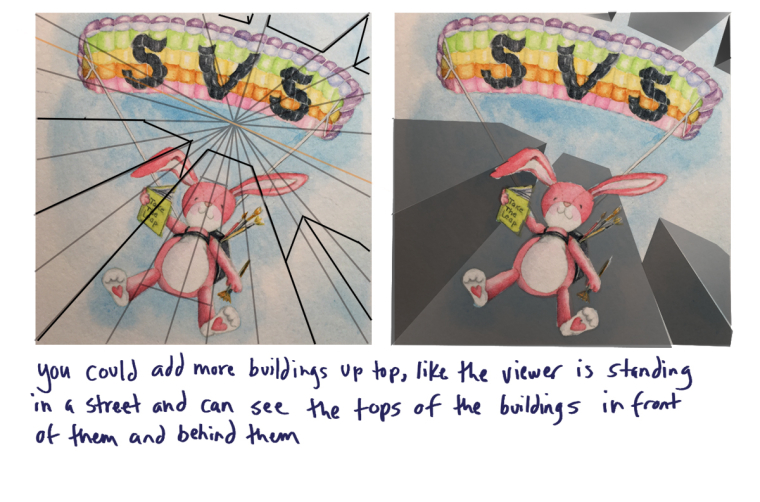
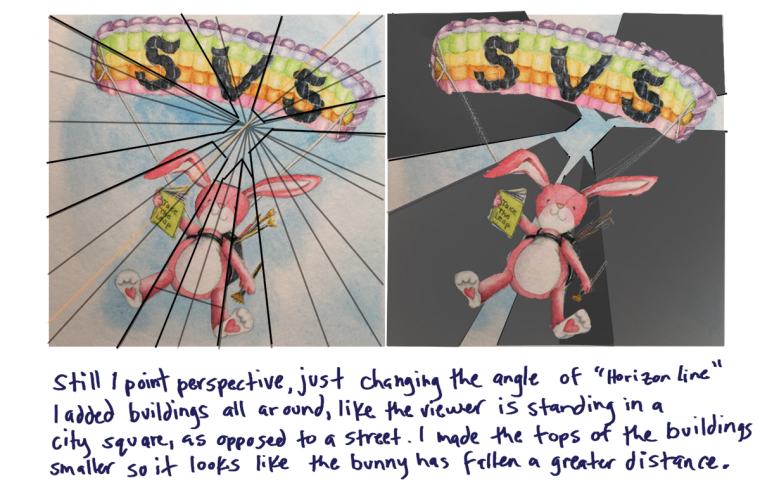
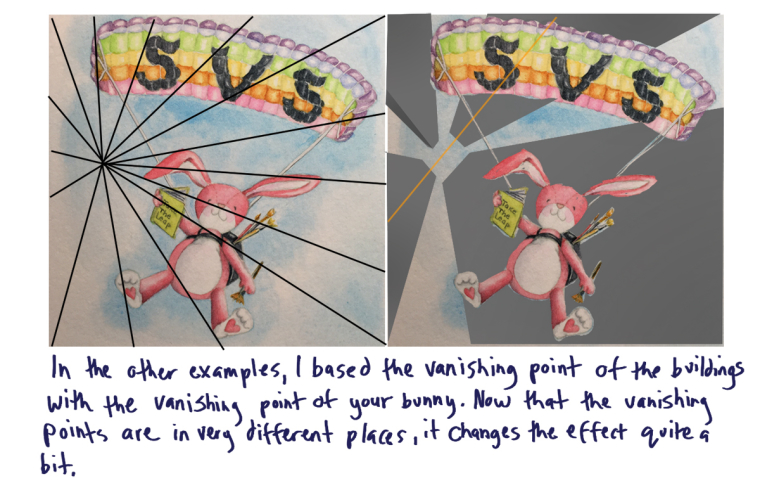
Hi Patty, I know that this wasn't your newest question, about how to apply perspective to your figures, but I thought these would be helpful. It's basically showing how you can use one point perspective to put in buildings for extreme perspective. I think your bunny was working well as you drew it, so I just wanted to show you how you could add in the buildings.
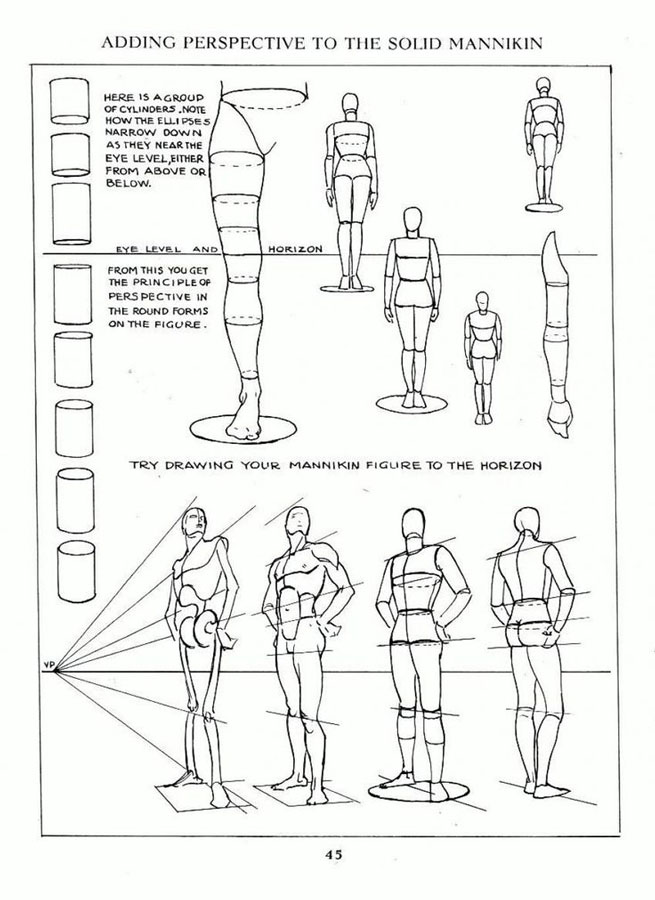
As far as using perspective knowledge for placing figures in extreme angles, I'm working on something for you right now. In the meantime, however, I think the biggest thing is being comfortable with drawing cylinders, cubes, and spheres. It takes a lot of practice to get comfortable. Working through "Fun with a Pencil" by Andrew Loomis will definitely help you be more comfortable with that. Here's a couple of good videos to watch.
https://www.ctrlpaint.com/videos/simplifying-form
https://www.youtube.com/watch?v=eFKMw8YekFY
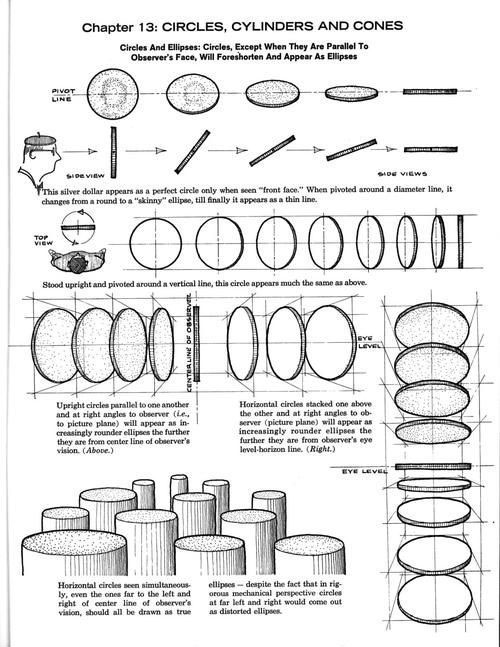
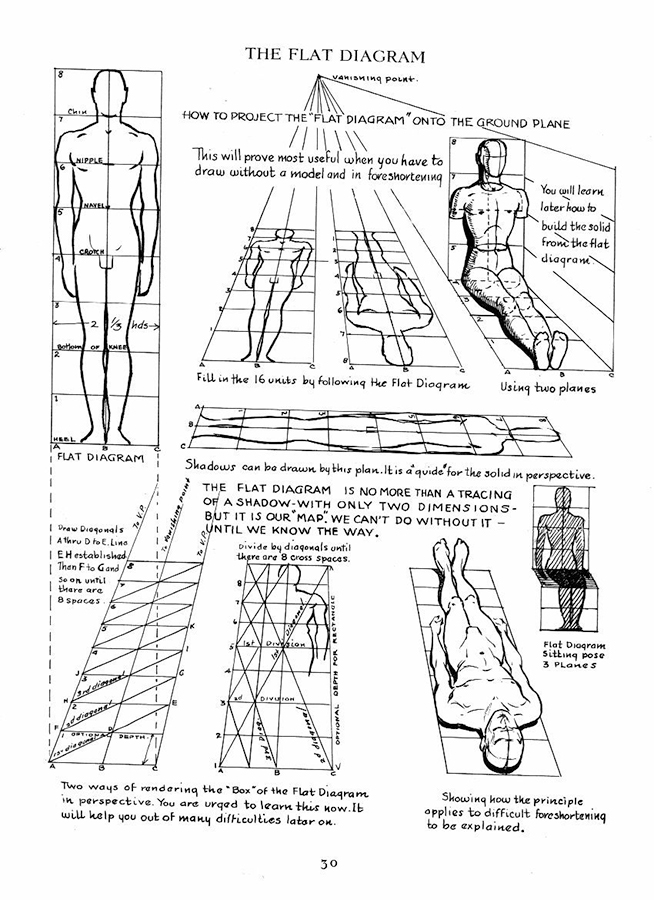
Here's a couple of sheets with concepts that are good to know for drawing figures in perspective:
I'll compile additional resources I have studied from later.
Website: www.tessawrathall.com
Instagram: www.instagram.com/tessawrathall_art/
-
@tessw oh my gosh Tess, you are a phenomenal resource!! I really feel SO thick-headed on basic concepts like horizon and point of view--I had no idea that what I was visualizing in my head as 3 point perspective was really 1 point perspective...boy do I have a ways to go, but I am recognizing things in Loomis's worksheets that correspond with what Will says in the Visualizing Drawing in Perspective (I went to that course first hoping I could "cheat" my way into understanding and drawing in perspective ha!). Thanks so much for all the encouragement and help on this. Your overdrawings with the perspective lines and buildings help me see what I could not see when I was trying to incorporate tall buildings on my own. I am committed to understanding and applying these concepts no matter how slow I am to get it. That commitment is progress for me because I usually become frustrated and give up, so thanks ever so much!!!
-
No problem!
Actually, you could use 3 point perspective for buildings in this scene, as well. Just like in more conventional compositions you might use 1 point for some scenes and 2 points in other cases. I just wanted to show you that you could use 1 point for a situation like that. I use that radiating pattern for a lot of up shots- and don't necessarily think of it as 1 point or 3 point perspective. It acts as a helpful guide, especially for things without corners or noticeable angles, like trees, or poles, or that cavern scene in my Inktober series. 3 point is not as scary as it seems, especially after you understand 2 point, so I'd encourage you to study it some time.
Just keep at it, keep doing drills, and learning from different sources if it helps. I've been learning perspective for awhile now, and it's still confusing and hard at times, but it does start to be more intuitive after awhile.

Website: www.tessawrathall.com
Instagram: www.instagram.com/tessawrathall_art/
-
@tessw I got "Fun with a pencil"
Thank you for that reference--this quote at the end really resonates, especially as it applies to perspective: "Lack of knowledge can be greater torture than the effort of acquiring it" 
-
Right on! Good quote. I love Fun with a Pencil because it helps build really useful skills but it feels less intimidating than other sources.
-
Hey, I wanted to address what was said about fudging the back corner of a box. There should be no need to fudge it at all. The back verticals will alwasy line up perfectly. The cool thing about perspective is that you can measure and you don't have to guess. That doesn't mean you get a free pass. Compostion, design, and all the other "art" stuff still has to be figured out...
SVS Faculty Instructor
www.leewhiteillustration.com -
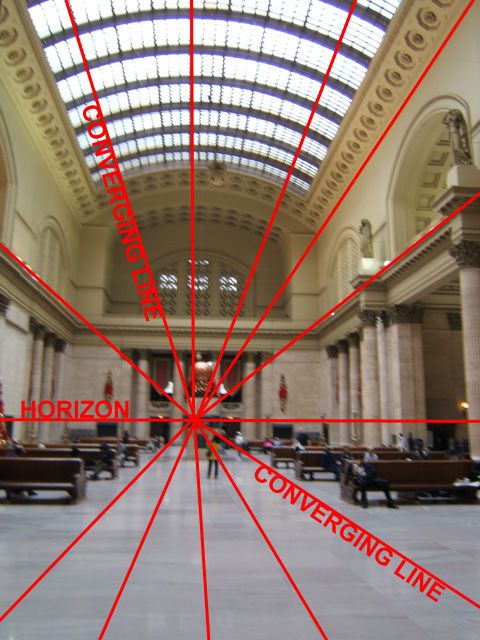
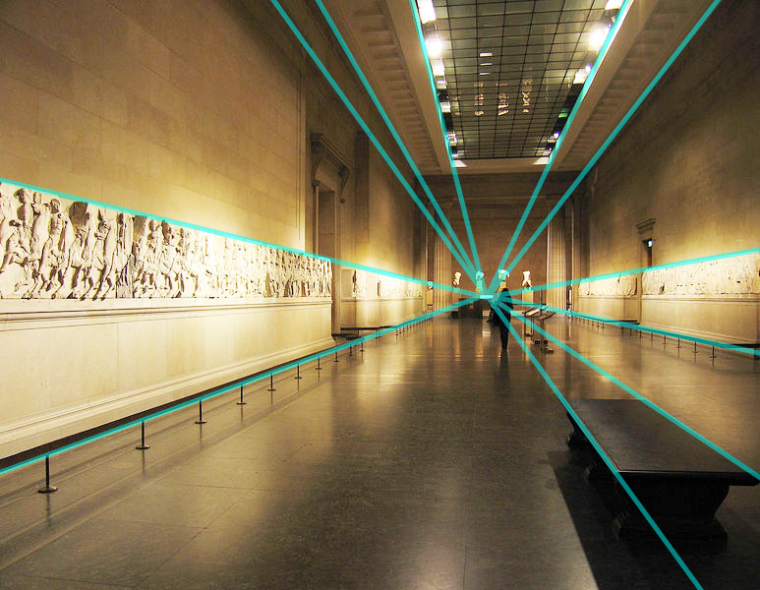
Here's another tip, if you are struggling to draw/understand perspective, stop trying to do it from scratch. Make it a practice to draw using a photo and try to understand the perspective. You can use buildings or people, or whatever. Just grab a bunch of photos and try to make sense of it. Then you can use the photo perspective as a base to build your drawing from. THis makes it much easier and you will learn it very quick. I'm not sure why perspective isn't taught this way in school. Doing this simple exercise for a month would clear up almost every question you have about perspective.
-
@lee-white Holy cow, what an obvious, and easy, exercise. Very helpful!
-
@lee-white I've always found it notoriously difficult to get those back corners to line up perfectly, even when I'm trying to be meticulous. In the example you posted, I can see where a couple of those back intersections aren't quite aligned with each other and the artist has placed that back corner nonetheless. Maybe I'm missing something, but that's what I consider fudging it- getting it very close, so it looks correct but not quite as close as a computer would. Am I wrong?
Website: www.tessawrathall.com
Instagram: www.instagram.com/tessawrathall_art/
-
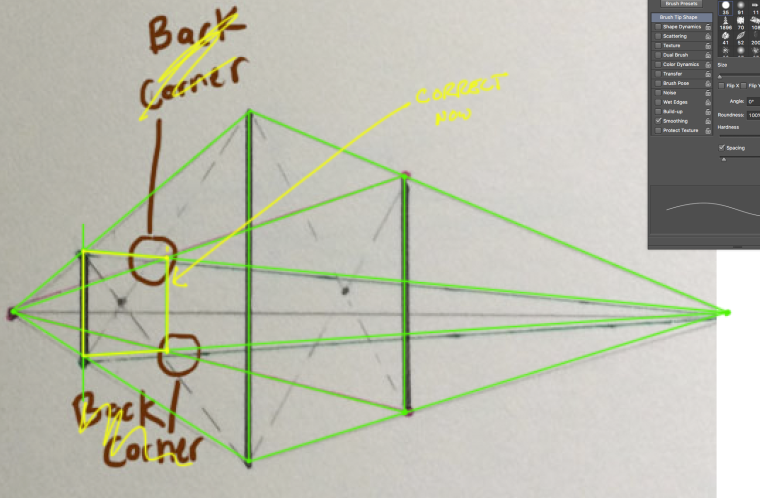
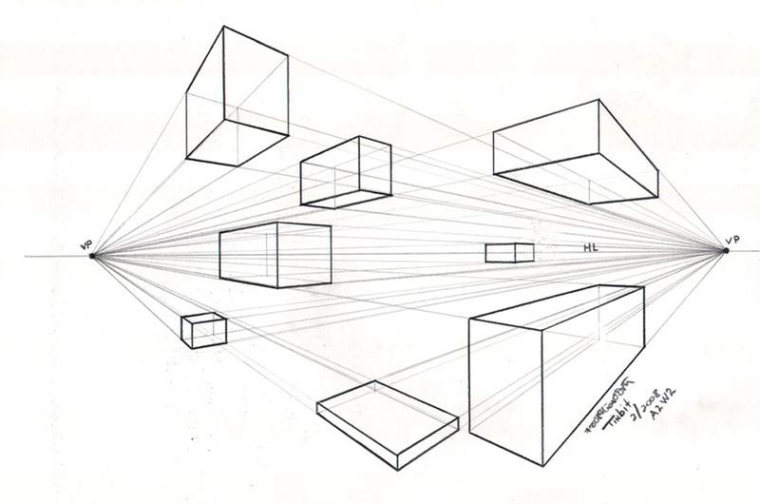
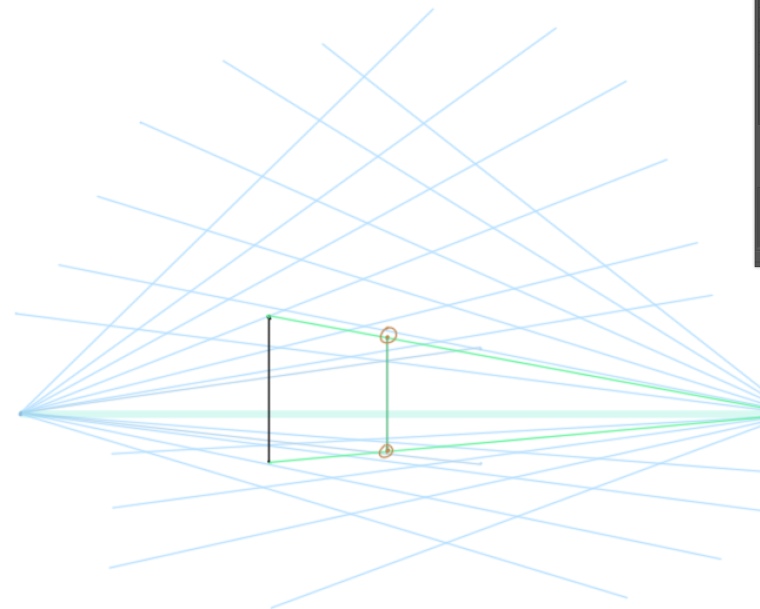
@tessw Can you show me where you are seeing the fudging the back corner in the example?
You shouldn't have to fudge it because it's basically math. What is probably happening with your drawings is that your grid isn't exactly right. maybe the lines don't go perfectly to the point on the horizon line, etc. That will cause a little shift in the perspective grid.
Using a perfect 2 point grid like I have here, It should line up perfectly every time.

BTW, It really doesn't matter too much if it's perfect, as long as it looks right (as you mentioned). I just wanted to clarify that the math does work out to place that back corner if the grid and object are drawn correctly. Either way, it should never be as slanted as that drawing earlier in this post. Something went very wrong there.
-
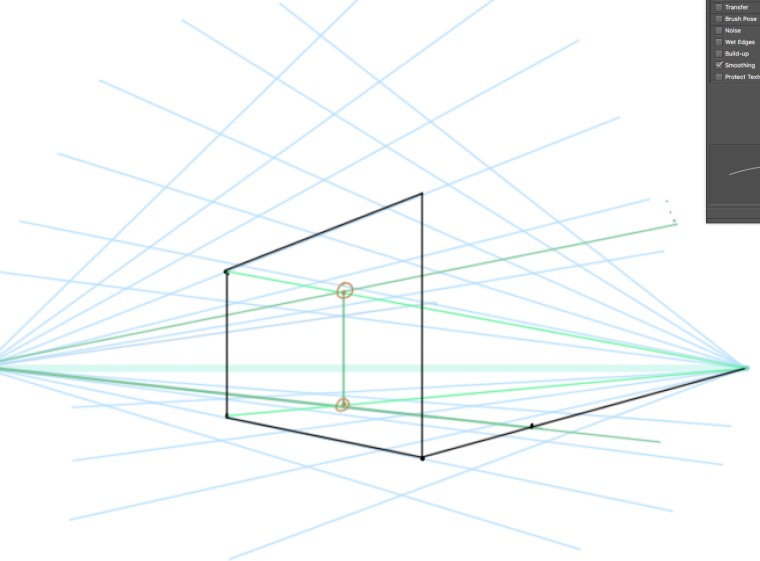
Here's another way to think about it. You should be able to draw the back box first and it would work out to be correct too. Since it's math, starting at any side should still show the same results. Here's a box where I built it from the back wall first...
-
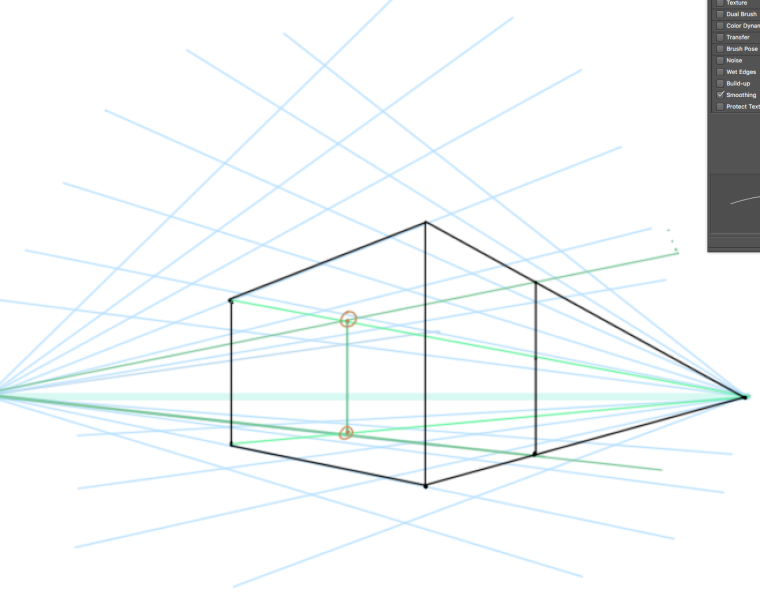
Using your drawing, I cleaned up the lines to the vanishing point, which causes the back to become correct again.